Laser Services
Everything you need to know about performing laser services at HelloSugar. Start with the essentials below or jump into the full course.
Laser Membership Pricing Model
How to Book Lasers
Laser Machine FAQ
- Power on: Turn the key switch to ON, then press the green power button on the control panel.
- Shut down: Press the red stop button, wait for the cooling cycle to finish, then turn the key to OFF.
- Water flow sensor
- Cooling system temperature
- Laser diode readiness
- 755 nm — Targets melanin in shallow follicles; ideal for fine/light hair.
- 808 nm — Gold-standard diode wavelength for medium-depth follicles.
- 940 nm — Deeper penetration for thicker hair and darker skin.
- 1064 nm — Deepest reach with the safest profile for Fitzpatrick V–VI skin types.
- The sapphire crystal tip is chilled by the internal water circulation system.
- In Ready mode, the tip cools to near 0°C.
- Full flush contact with the skin is required — angling or hovering removes the cooling benefit while the laser still fires, risking burns.
- Target: as close to 0°C as possible.
- Minimum: sapphire tip must be below 7°C.
- You should see condensation or frost on the tip.
- If the tip feels warm or dry, do NOT treat.
- Check the water level daily before your first treatment.
- Always fill with distilled water to the marked line.
- Low water triggers a system alarm and can damage the cooling pump.
- Replace the water filter core every 3 months or when flow rate drops.
- No. The Diolux Quad (the “Emvera”) has a fixed large-format spot size (~12×20 mm).
- Only the Hello Sugar proprietary machine uses interchangeable tips — when changing tips, the machine must be in Standby and the correct spot size selected on screen.
- After each client, wipe the sapphire window with a soft lint-free cloth dampened with distilled water.
- For stubborn residue, use isopropyl alcohol on the cloth.
- Never scrape the sapphire surface or use abrasive materials.
- Fluence (J/cm²) — Controls total energy delivered. Lighter skin can tolerate higher fluence.
- Pulse Width (ms) — The primary safety lever. Increase it for darker skin to bypass the epidermis.
- Frequency (Hz) — Controls firing speed. 1–3 Hz for detail/face work, 5–10 Hz for body (in-motion).
- Technician: Wavelength-rated safety glasses covering 755–1064 nm with OD > 5.
- Client: Opaque metal eye shields or wavelength-specific goggles.
- Stop treatment immediately.
- Apply a cold compress to the area.
- Do not apply topical creams unless directed by a medical professional.
- Document the incident with photos and notes.
- Notify your manager and follow your location’s incident reporting procedure.
- Verify the water tank is filled to the line with distilled water.
- Check that the water flow sensor is not blocked.
- Ensure the key is fully turned to ON.
- If the screen shows an error code, refer to the error code table below.
- If the issue persists, power cycle the machine (off for 30 seconds, then on).
- Contact your manager if the problem continues.
- Check the water level and filter.
- Feel the water lines running to the handpiece — they should be cold.
- If the lines are warm, the cooling pump may have failed.
System Warning Icons & Error Codes
If the machine displays any of the following alarms or error codes, stop treatment and troubleshoot before continuing.
Common Alarms:
- Water Flow Warning — Water level low or flow sensor blocked. Refill with distilled water and check the filter.
- Over-Temperature — Internal temperature too high. Let the machine cool for 10–15 minutes before resuming.
- Handpiece Disconnected — The handpiece cable is loose. Power down, reseat the connector, and restart.
- Interlock Open — The safety interlock (door sensor or key) is disengaged. Verify the door is closed and the key is in the ON position.
Error Codes:
| Code | Meaning | Action |
|---|---|---|
| E01 | Water flow failure | Check tank level & filter; restart |
| E02 | Cooling system over-temp | Power off, wait 15 min, restart |
| E03 | Laser diode fault | Power cycle; if persists, contact service |
| E04 | Handpiece communication error | Reseat handpiece connector; restart |
| E05 | Power supply fault | Check outlet & breaker; contact service |
| E06 | Interlock fault | Verify door closed & key ON; restart |
Laser Maintenance
Water & Cooling System
- Use only distilled water—tap water causes mineral buildup and sensor damage.
- Check the water level daily before first treatment.
- Replace the water filter core every 3 months (or when flow rate drops).
- Drain and refill the entire tank every 6 months.
- Inspect water lines for kinks, leaks, or discoloration monthly.
Optical & Handpiece Care
- Wipe the sapphire tip with a soft lint-free cloth after every client.
- Use distilled water or isopropyl alcohol on the cloth—never abrasive materials.
- Inspect the tip for cracks or chips weekly; do not treat with a damaged tip.
- Check the handpiece cable for fraying or exposed wires weekly.
- Store the handpiece in its holster when not in use to prevent drops.
Periodic & Storage
- Run a full cooling cycle (ready mode with no treatment) once per week to test the system.
- Clean the exterior panels and screen with a damp cloth weekly.
- If the machine will be unused for more than 2 weeks, drain the water tank and run the pump dry for 30 seconds.
- Store in a climate-controlled environment (15–30°C, <80% humidity).
General System Safety
- Always power down using the proper shutdown sequence—never pull the plug.
- Never block the rear ventilation openings.
- Ensure the machine is plugged into a dedicated circuit (no shared outlets with high-draw devices).
- Keep the area around the machine clear of liquids, gel spills, and clutter.
Water Filter Core Replacement Steps
Maintenance Schedule Summary
| Frequency | Task |
|---|---|
| After each client | Wipe sapphire tip with lint-free cloth |
| Daily | Check water level; top off with distilled water |
| Weekly | Inspect tip for damage; check handpiece cable; clean exterior; run test cooling cycle |
| Monthly | Inspect water lines for kinks/leaks |
| Every 3 months | Replace water filter core |
| Every 6 months | Drain & refill water tank completely |
- Always use distilled water—tap water voids cooling system warranties.
- Never treat with a cracked or chipped sapphire tip.
- If an error code persists after power cycling, tag the machine out of service.
- Log all maintenance in the location’s equipment maintenance sheet.
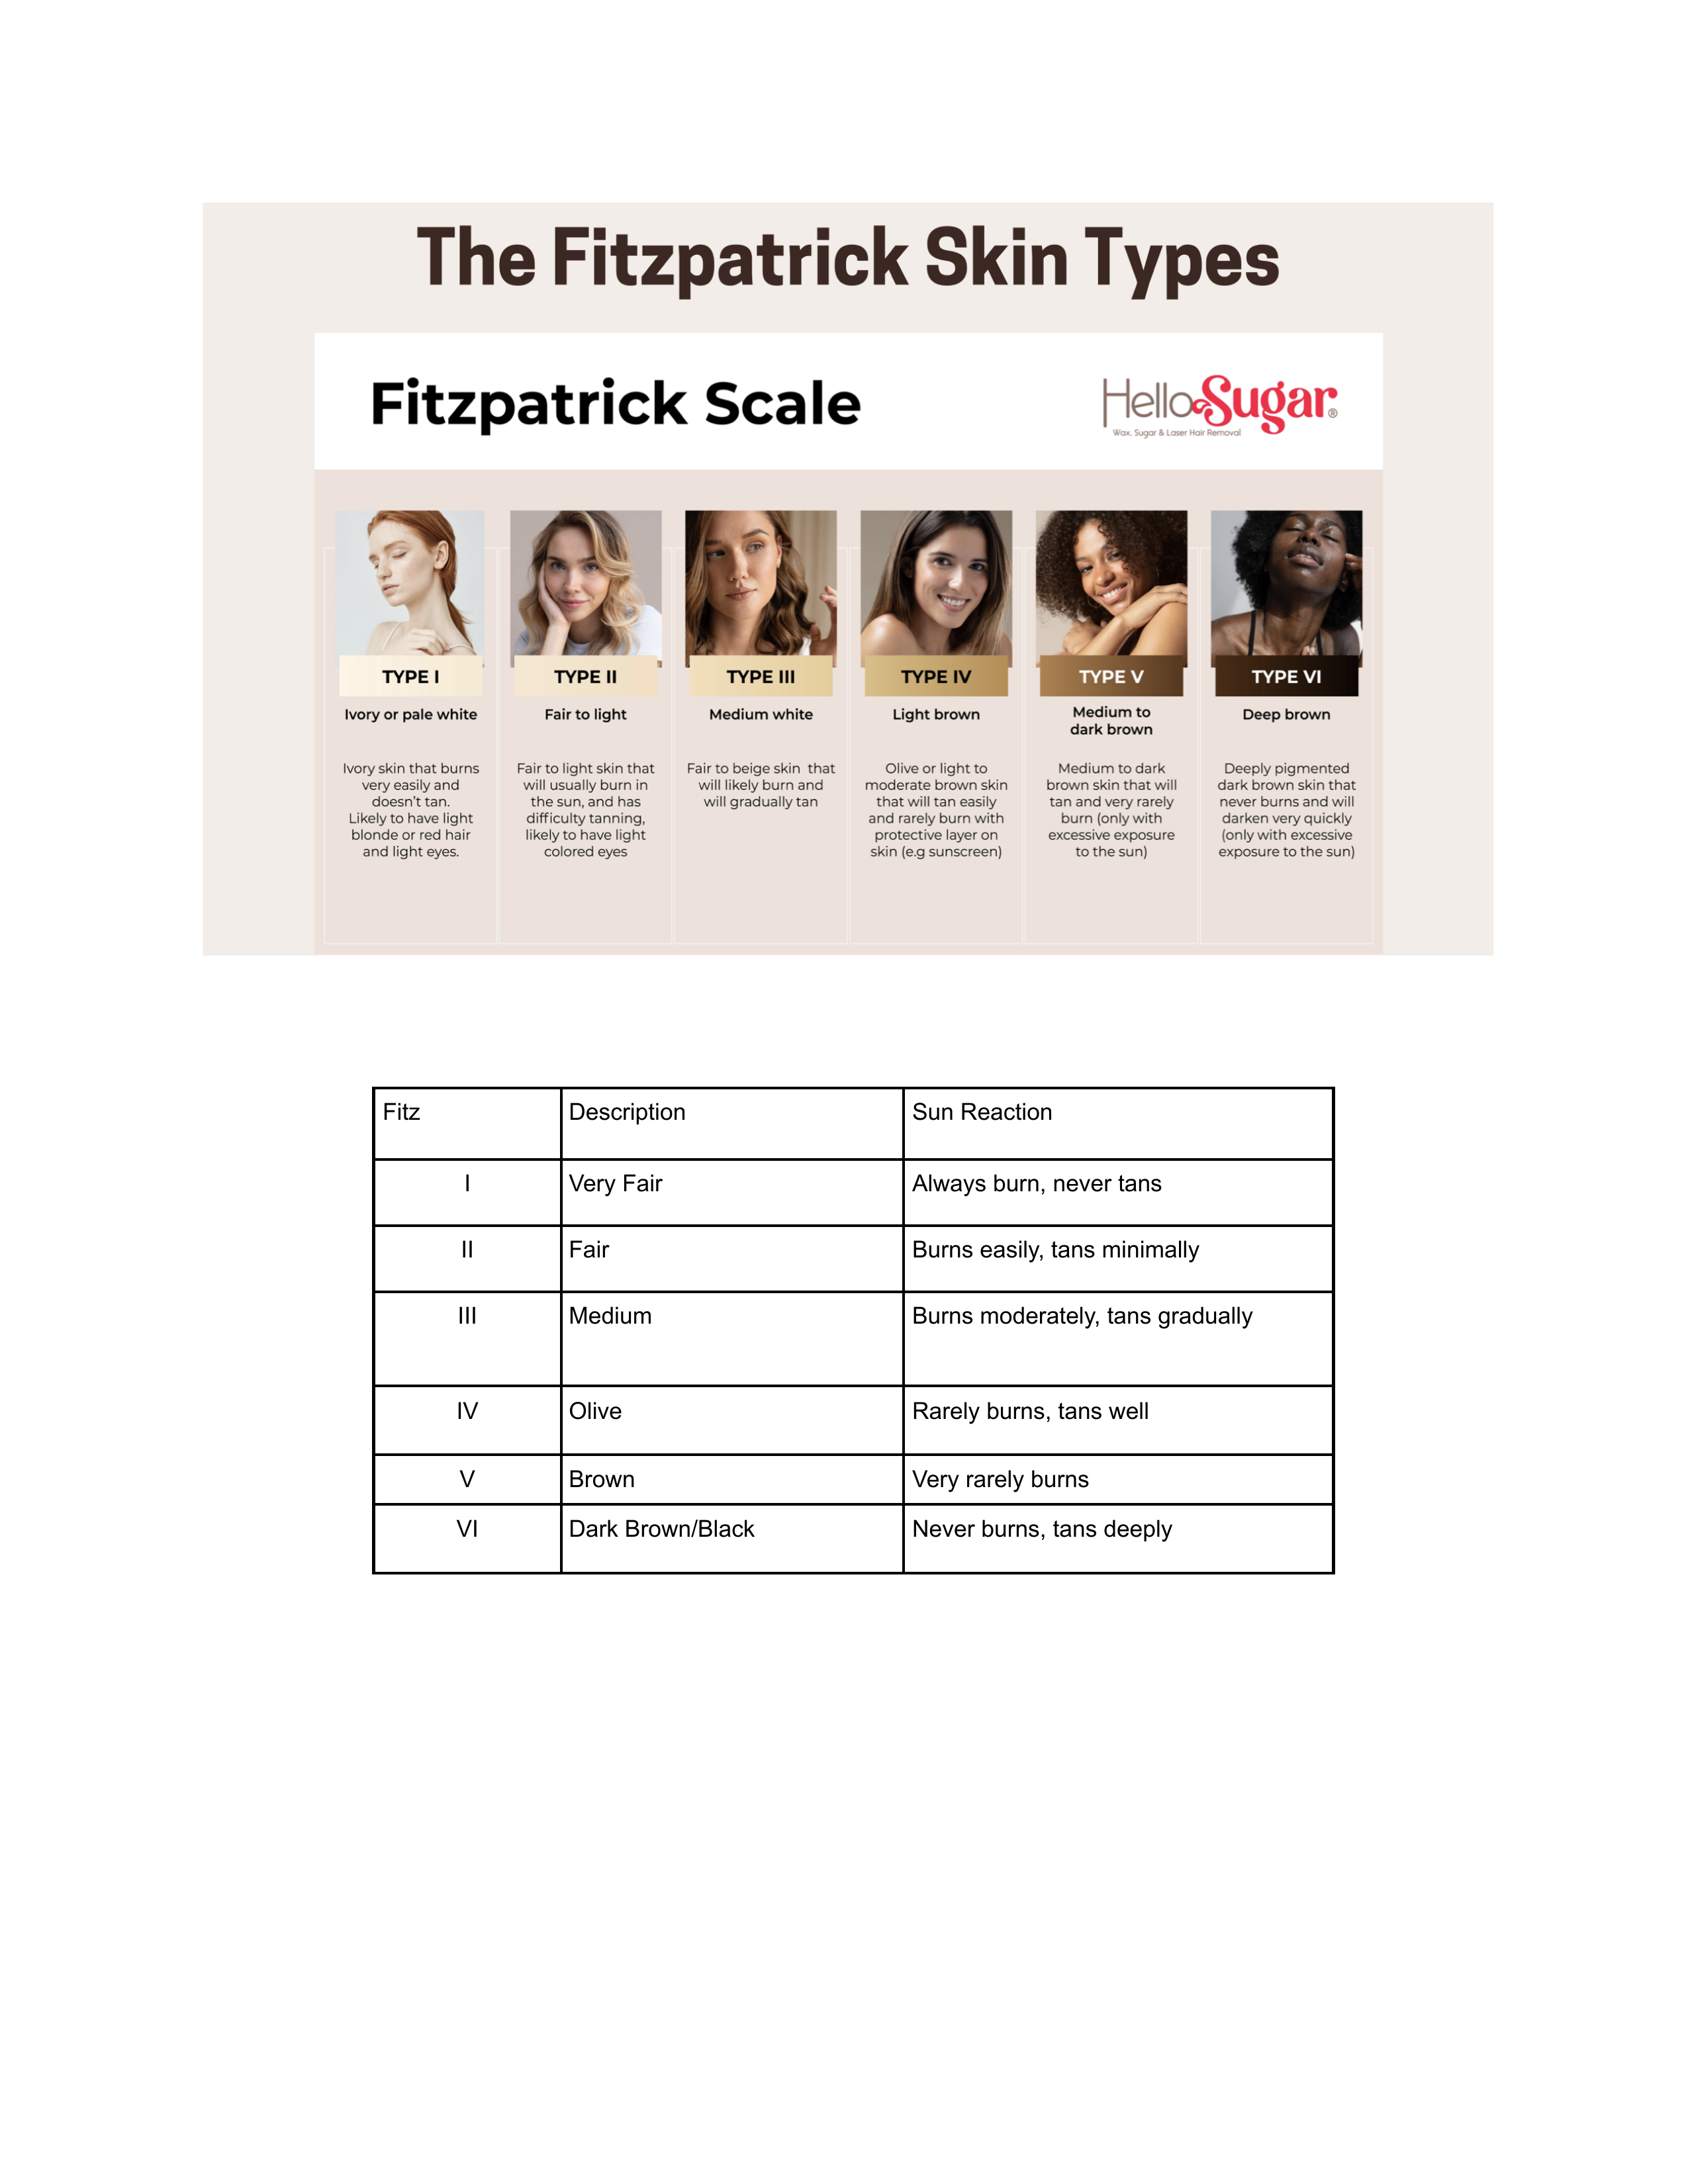
NILA Laser Quick Guide


Fitzpatrick Skin Types
Treatment Steps
b. KEEP LASER GUN IN THE HOLSTER, and point away from you.
c. Laser will put itself back on standby when you are at 5 Degrees.
d. The laser hand piece must be as close to 0 Degrees as possible. When ready to use, put back in ready mode and wait for the handpiece to cool entirely.
Client Log Notes
Must include:
- Test spot range
- Overall pain sensation and if they experienced any elevated areas
- Any notable skin reactions
Only note IF the following occurs:
- SOS (Smell of Success) — Burnt hair
- Crackling
- Volunteers (hair that ejects from the follicle) — You may see them on your 4x4 at clean up
Post Care: 48–72 Hours
- No sweating
- No sun exposure
- Gently cleanse
- No exfoliation
- May feel a “sunburn” like sensation for up to 24 hours.
- After 72 hours, clients should exfoliate 2–3 times a week to help aid volunteer extraction.
- Clients may see volunteers up to 2 weeks post treatment.
Hello Sugar: Laser Hair Removal Standard Operating Procedures — Clinical Policy & Safety Manual — Last Updated 2/19/26
Authorized Personnel: Certified Laser Technicians / Estheticians / Medical Professionals
1. Device Inventory & Specifications
While the hardware differs, clinical settings have been standardized across both platforms. Technicians must verify which machine is being used to ensure proper handling of spot sizes.
Device A: The “Emvera”
- Maker: Emvera Diolux Quad
- Type: High-Power Diode with Blended Wavelengths (755nm, 808nm, 940nm, 1064nm)
- Cooling: Sapphire Crystal Contact Cooling
- Spot Size: Fixed (Large format, approx 12×20mm)
Device B: The “Hello Sugar”
- Maker: Hello Sugar Proprietary
- Type: Standard Diode (Pure 808nm)
- Cooling: Sapphire Crystal Contact Cooling
- Spot Size: Interchangeable / Multiple
- Protocol: When changing tips, the machine must be in “Standby.” Technicians must manually select the corresponding spot size on the screen to ensure calibration.
2. Room Setup, Hardware & Safety (NOHD)
The treatment room is designated as a Nominal Ocular Hazard Zone (NOHD).
A. Required Signage
ANSI standards require the specific warning sign for the laser in use to be visible on the door exterior.
B. Security Hardware (Access Control)
To prevent unauthorized use, the facility must utilize one of the following approved access restriction methods:
- Option 1: Physical Plug Lockout (Recommended) — A physical shell encases the electrical plug, secured by a padlock. Hardware: BOZZYS Electrical Plug Lockout + Wall-Mounted Key Lockbox.
- Option 2: Room Access Restriction — The treatment room door is secured by a lock. The door remains auto-locked when not in use. Only authorized clinical staff possess the code/key.
- Option 3: Smart Plug / Digital Power Control — The laser is plugged into a high-amperage smart plug that cuts power remotely. Ensure smart plug amperage rating meets or exceeds the laser’s power draw requirements.
C. Room Protocols
- Entryway: The “DANGER” sign must be illuminated or posted at eye level.
- Protective Eyewear (Mandatory):
- Technician: Must wear glasses rated for 755nm–1064nm (OD>5).
- Patient: Must wear opaque metal shields or wavelength-specific goggles.
- Reflective Surfaces: All mirrors must be covered.
D. Supplies & General Equipment
- Conductive Gel
- iPad
- From Hello Sugar Store: Wood sticks, Table paper, Gloves, Esthie Wipes, Cleanser
- Mapping Pen
- Razors
- CaviWipes
- Alcohol
- Spray Bottle
3. Device Settings: The Unified Protocol
Technicians may use these parameter guidelines regardless of the laser make and model.
A. The Four Levers of Safety & Efficacy
1. Fluence (J/cm²): The total energy delivered.
Rule: Lighter Skin = Higher Fluence. Darker Skin = Lower Fluence.
2. Pulse Width (ms): The duration of the laser shot.
Safety Rule: This is the primary safety lever. You must increase pulse width (slower shot) as skin gets darker to bypass the epidermis.
3. Frequency (Hz): The speed of firing.
Protocol: 1–3 Hz for Detail/Face; 5–10 Hz for Body (In-Motion).
4. Cooling (The Invisible Lever): Since we use Contact Cooling, technique is a safety setting.
- Temperature Check: The sapphire tip must be cooled to below 7°C.
- Physical Check: Physically touch the tip to verify it is cold. You should see condensation (wetness) or frost. If the tip feels warm or dry, DO NOT TREAT.
- Full Contact: You must maintain 100% flush contact. If you “hover” or angle the handpiece, the cooling fails, but the laser still fires — causing burns.
B. Universal Decision Matrix
C. Testing Protocol (Verification)
Before performing the full treatment, you must verify the settings are safe for the specific client on that specific day.
- Mandatory For: ALL clients at EVERY visit. (No exceptions).
- Location: Choose a hair-bearing area immediately adjacent to the treatment zone.
- Face: Use the Jawline.
- Legs: Use the Inner Thigh/Leg.
- Bikini: Use the Inner Thigh/Groin crease.
- Procedure (The Ladder Method):
- Select 3 progressive fluence levels (Low → Medium → Target) per the one-pager.
- Fire 3 distinct test pulses, spaced 1 cm apart.
- Endpoint: Wait 90 seconds. Look for Perifollicular Edema (PFE) or mild erythema. If the skin turns gray/white or blisters, settings are too high.
D. Spot Size Adjustment Rule
- Emvera: No adjustments (Fixed tip).
- Hello Sugar Device: Spot size may be reduced depending on location (e.g., using smaller tips for precision areas like the face or bikini line).
4. Clinical Protocols & Patient Care
A. Pre-Treatment Requirements
- Sun Exposure: No direct sun/tanning beds for 2 weeks prior.
- Fake Tan: Absolute Contraindication. Must be scrubbed off 48 hours prior. If residue is found, reschedule.
- Shaving: Area must be shaved 12–24 hours prior.
- Skin: Clean, free of lotions/deodorant.
B. Treatment Technique (Overlap)
Proper overlapping ensures complete coverage without creating “hot spots” that cause burns.
- The Standard: Technicians must maintain a 30% overlap between each pulse or pass.
- Under-Overlap (<10%): Results in “Zebra Striping” (visible streaks of hair left behind).
- Over-Overlap (>50%): Risks “Bulk Heating” (heat stacking), which can lead to burns.
- Technique: Use the previous pulse’s imprint (or gel track) as a guide. The new spot should cover roughly one-third of the previous spot.
C. Desired Clinical Endpoint
- Perifollicular Edema (PFE): Small, hive-like bumps/redness around the follicle.
- Singe/Smell: Burnt hair smell or “frazzled” hair tips.
Acceptable (Normal): No visible reaction is also normal. If the client reports the appropriate sensation (mild prickling/warmth) and you are using the correct settings, the treatment is effective. Do not increase energy unsafely just to “chase” a visual reaction.
- Gray/White Discoloration: This is an epidermal burn.
- Skin Separation/Blistering: Settings are too high or skin was tanned.
D. Ramp Rates (Breaking the Plateau)
Ramping is used to break through a “Plateau” when hair reduction stalls. As hair becomes thinner, it absorbs less heat.
- When to Ramp: If the client reports a plateau in results AND has shown no adverse reactions to prior treatments.
- Fitzpatrick Types I–IV: Increase Fluence by +2 Joules.
- Fitzpatrick Types V–VI: Increase Fluence by +1 Joule.
- Stop Ramping If: Client reports pain above 2 out of 5, or you reach the maximum safe limit for the skin type.
E. Medication Guidelines (Contraindications)
Technicians must review this list with the client at every single visit.
- Isotretinoin (Accutane): Must be off for 6 months minimum.
- Pregnancy: We do not treat pregnant clients.
- Gold Therapy (Gold Salts): History of use (risk of chrysiasis/skin graying).
- Active Infection: Cold sores (Herpes Simplex) or open wounds in the treatment area.
- Epilepsy/Seizures: If triggered by light flashing (Photosensitive Epilepsy).
- Antibiotics: Tetracyclines (Doxycycline, Minocycline), Fluoroquinolones (Cipro, Levaquin), Sulfonamides (Bactrim).
- Antifungals: Griseofulvin.
- Diuretics: HCTZ (Hydrochlorothiazide).
- St. John’s Wort: Herbal supplement (Highly photosensitizing).
Stop using these products only in the area being treated.
- Retinoids: Retin-A, Tretinoin, Differin, Tazorac.
- Acids: Glycolic, Salicylic, Lactic, Alpha Hydroxy Acids (AHAs).
- Benzoyl Peroxide: High concentrations.
F. Expected Number of Sessions
- Target: Anagen (Growth) phase of hair. Only ~15–20% of body hair is in this phase at any given time.
- Standard Course: 9 to 12 sessions for 75–90% reduction.
- Spacing: Face: Every 4 weeks. Body: Every 6 weeks.
- Factors: PCOS, hormonal imbalances, and irregular attendance will extend the number of sessions required.
5. Post-Treatment & Security Protocol
A. Aftercare Instructions
- The “24-Hour Heat Rule”: No gym, saunas, hot tubs, or hot showers for 24 hours.
- Sun Protection: SPF 30+ mandatory on treated areas.
- Shedding: Hair will appear to “grow” for 1–3 weeks before shedding.
B. Equipment Shutdown & Access Protocol
Step 1: Device Shutdown
- Wipe sapphire crystal with non-corrosive disinfectant (e.g., CaviWipes).
- Place handpiece securely in the holster.
- Turn the Laser Interlock Key to “OFF” and remove the key.
Step 2: Access Restriction
- Physical Lockout: Unplug laser, install Plug Lockout shell, lock it, store key in the Lockbox.
- Room Restriction: Ensure the treatment room door is pulled shut and the lock is engaged.
- Smart Plug: Open the control app and toggle power to “OFF” for the night.
Step 3: Secure Storage
- Place the Laser Interlock Key in the designated secure location (Safe, Lockbox, or Manager’s Office).
- Never leave the key in the machine.
C. Start of Shift
- Retrieve Laser Interlock key.
- Disengage your chosen security method (Unlock plug, Unlock room, or Activate smart plug).
- Insert Interlock key and turn machine on.
6. Technique & Mapping Videos
Technicians must review the following training videos to ensure proper grid overlap and coverage.
- Brazilian & Bikini Mapping
- Full Leg Mapping Technique
- Underarm Grid Application
- Face & Neck Safety Zones
7. Adverse Event Management / Burn Protocol
In the rare event of a suspected thermal injury, technicians must follow this protocol immediately.
A. Identification (Burn vs. Histamine Response)
- Gray/White Epidermis: Looks like “frost” or blanched skin immediately after pulse.
- Blistering: Bubbling of the skin surface.
- Extreme Pain: Client reports burning sensation persisting 5+ minutes after treatment stops.
B. Immediate Action Protocol
2. Cool the Area:
- Apply cool compresses or cold wet towels immediately.
- DO NOT apply ice or frozen packs directly to the skin — this can constrict blood flow and worsen damage.
- Protocol: Apply for 10 minutes ON, 5 minutes OFF. Continue for at least 20–30 minutes until heat sensation subsides.
- If skin returns to normal color (just red): It may be extreme erythema. Monitor.
- If skin remains gray, white, or blisters form: It is a burn.
C. Post-Incident Care
- Keep it Moist: Apply a generous layer of Aquaphor, Vaseline, or Silicone Gel. Do not use scented lotions.
- Do Not Pop Blisters: Instruct client explicitly to never pick, scratch, or pop blisters — leads to scarring and infection.
- Documentation: Take clear photos of the area (with client consent). Fill out an Incident Report Form immediately.
- Reporting: Notify the Medical Director / Manager immediately. Follow up with the client within 24 hours via phone call.
D. Other Common Reactions & Management
Folliculitis (“Laser Acne”):
- Appearance: Small whiteheads or red pustules 1–3 days post-treatment. Typically sterile inflammatory reaction.
- Action: Keep area clean. Do not pop/squeeze. Apply Hydrocortisone 1% cream. Resolves in 3–5 days.
- Seek Medical Attention If: Area becomes hot to the touch, redness spreads, fever develops, or pustules discharge yellow/green fluid.
Histamine Reaction (Urticaria):
- Appearance: Intense itching, raised welts, or hives that may last 24+ hours. Common on legs.
- Action: Oral Antihistamine (e.g., Benadryl, Claritin) and topical Hydrocortisone.
- Seek Medical Attention If: Hives persist longer than 72 hours despite medication, or shortness of breath, throat tightness, or swelling of the lips/tongue.
Crusting / Scabbing:
- Appearance: Small, dark scabs where the hair was thickest.
- Action: Do not pick. Keep moist with Aquaphor. Let them fall off naturally.
- Seek Medical Attention If: Scabs show signs of infection (yellow oozing, increasing pain/warmth) or do not heal within 10–14 days.
8. Medical Director: Usage and Authority
The Medical Director serves as the physician or licensed practitioner with overall responsibility and final authority for the clinical and safety policies of all laser procedures performed in the facility.
- Final Authority: The Medical Director is the final signatory and authority for this SOP Manual and all clinical protocols contained within.
- Delegation of Authority: The Medical Director delegates the authority to perform laser procedures to the Authorized Personnel listed on the front of this manual, provided they maintain current training and adhere strictly to these protocols.
- Protocol Review: The Franchisee must ensure this document is formally reviewed and re-approved by the Medical Director annually, or immediately following the introduction of any new laser device, major clinical policy change, or significant regulatory update.
- Adverse Event Reporting: As mandated in Section 7, the Medical Director or designated Manager must be notified immediately upon the occurrence of a thermal injury or any other significant adverse event. All Incident Reports must be submitted directly to the Medical Director for review and sign-off.
- Availability: The Medical Director’s contact information and emergency escalation procedures are maintained by the facility Manager and must be accessible to all Authorized Personnel during operating hours.

Laser MCR Course
How to sell laser memberships and boost conversion rates with prospects.
Module 1: Intro
Intro
This course walks laser techs through every step of the client interaction — from greeting to close — so you can successfully sell laser memberships. It covers the full process: how to talk to clients during their service, how to uncover their needs, how to educate them, and how to present the membership.
Greeting Your Client
Clients coming in for laser may be nervous and unsure what to expect. Your greeting sets the tone for the entire service and sale.
The Approach
Greet them warmly as soon as you see them in the lobby or hallway. Introduce yourself and use friendly, welcoming language — whatever feels natural to your personality. The key is making them feel comfortable before you bring them back to the treatment room.
Before heading to the room: Make sure the client has all their forms filled out ahead of time. Don't wait until you're in the treatment room to handle paperwork.
Module 2: Find Their Why
Hair Removal History
Start asking hair removal history questions as soon as you're in the treatment room — while the client is getting undressed, getting on the table, and while you're filling out the treatment log and taking photos of the areas you'll be lasering.
Three questions to ask:
- What is your current method of hair removal? (shaving, waxing, sugaring, etc.)
- When did you last do it? And how often do you typically use that method?
- Have you ever used other methods? Specifically ask: have you ever waxed or sugared? Have you ever lasered this area before?
Why this matters
Understanding their full hair removal history helps you as the provider know what their previous experience has been — what benefits they got or didn't get from other methods. This sets you up to educate them and paint a picture of what they'll experience with laser going forward.
Don't forget to ask about consistency. Just like with wax and sugar memberships, whether someone was doing it monthly vs. randomly tells you a very different story about what results they actually achieved. By the end of these questions, you should have a well-rounded picture of every hair removal method the client has used.
How To Find The Why
After gathering hair removal history, you need to understand what brought this client in for laser specifically. Ask: "What made you decide to get laser hair removal?"
Listen carefully — some clients will give you a secondary need, not their real one. A secondary need tells you what pushed them to book, but not the actual problem they're hoping to solve or the benefit they want.
Examples of secondary needs (not the real why):
- "My friend told me about it"
- "My esthetician/waxer recommended it"
- "I saw the ad or promotion"
- "I've always wanted to give it a try"
None of these tell you a benefit they're looking for or a problem they currently have.
The follow-up question:
If you hear a secondary need, dig deeper by asking: "So why get laser hair removal today rather than [their current method]?" For example, if they told you they currently shave, ask: "So why get laser today rather than just shave?"
This should get you closer to their real need — the actual value they're hoping to get from the service.
Real Needs
After asking what made them try laser and digging deeper past any secondary needs, you should start hearing one of three real needs. Know what they sound like so you can recognize them.
Need 1: Maintenance & Time
The client is telling you their current method takes too much time or is too much upkeep. This sounds like: "I don't like how often I have to shave," or "My hair comes back too quickly when I shave or wax." They want a lower maintenance routine or less time spent on hair removal.
Need 2: Ingrowns
Many clients still get ingrowns even after switching from shaving to waxing or sugaring. Waxing reduces ingrowns but doesn't eliminate them for everyone. You might hear: "I'm still getting ingrowns when I wax/sugar." This is a clear pain point — and laser is the solution. When you hear a problem, that's great, because you have something to educate them on.
Need 3: Less Hair
This is the most generic answer — the client simply wants less hair. If you hear this, dig deeper because it often uncovers one of the first two needs.
How to dig deeper:
Ask "What makes you say that?" or "Tell me more." For example, if they say "I just want less hair," and you ask what makes them say that, they might reveal: "Shaving is too much maintenance" (Need 1) or "I'm still dealing with ingrowns" (Need 2).
But also recognize that wanting less hair is a valid need on its own — some clients simply have more hair than they'd like, it's bothersome, and they don't want to deal with any hair removal method as often.
Get The Details & Validate
As the client opens up about their needs, your job is to expand on the pain point and validate what they're saying — not rush to a solution.
Why this matters:
People buy in an emotional state, not a logical state. This isn't about being sleazy — it's about helping them actually feel the problem they've been living with so that when you offer a solution, they're in a mindset to genuinely consider it. It's easy to go through day-to-day life on autopilot. You need the client to stop and think about their pain during this service before you present laser as the answer.
Questions to expand the pain point:
- "How long have you been disliking [shaving/waxing/sugaring]?"
- "How often are you dealing with those ingrowns? Is it every week?"
- "How long have you been wanting thinner hair?"
- "How long have you been looking for a solution?"
You want them to feel that pain and get into a state where they want to solve it.
Validate as they talk.
Throw in phrases like:
- "Wow, I get that."
- "I've dealt with that myself before."
- "Sounds like this has been bothering you for a while."
- "Sounds like you've been looking for a better solution for a while."
Validate first, then educate. Don't rush into offering a solution.
Timing:
You should be about a quarter to halfway through the service at this point in the conversation. Take your time — there's no rush.
Before moving on: Ask if there's anything else they were hoping to get out of laser. Sometimes you focus on one big pain point, but the client may have more than one need. Uncover all of them before moving to education.
Module 3: Educate The Client
Understanding Clinical Endpoint
Before you can educate clients, you need to understand the science yourself. Here's the foundational knowledge every laser tech needs.
The Three Stages of Hair Growth
Hair grows in three stages: Anagen (growth), Catagen (transition), and Telogen (resting). Laser is most effective during the Anagen stage because that's the only stage where the hair is attached to the follicle. When attached, the heat from the laser has the highest likelihood of killing the follicle or miniaturizing the hair. During Catagen and Telogen, the hair is detached — so treatment is less effective.
Why Multiple Treatments Are Required
At any given time, only about 20–40% of hairs in an area are in the Anagen stage. So on day one, you're only effectively treating 20–40% of the hair. It takes 4–6 months for all the hairs in an area to cycle through all three stages and come back to Anagen so you can treat the same hairs again.
This means you need to treat for more than six months to get through all the hair — which is why the average is about 16 treatments to reach clinical endpoint. You need to treat the same hair follicles 2–3 times while they're in Anagen to reach true clinical endpoint for all the hairs in that area.
Your Role as the Tech
You determine how long each client needs to wait between treatments. Different areas cycle at different speeds — some areas will be ready to treat again sooner, some take longer. Understand that not all hairs are in the optimal stage on day one, and plan the treatment schedule accordingly.
Total Time from End of Anagen → Back to Anagen
For most body areas: approximately 4–6 months. But this varies:
| Area | Approximate Full Cycle | Anagen % at Any Given Time |
|---|---|---|
| Underarm | 4–6 months | 30–40% |
| Bikini | 3–6 months | 30–40% |
| Arms | 4–7 months | 20–30% |
| Legs | 4–8 months | 20–30% |
Reaching Clinical Endpoint Example
This is a practical example of the hair growth cycle in action. Assume you're treating an area where about 20% of hairs are in Anagen at any given time.
Treatments 1–5: First pass (new growth)
Each session treats about 20% of hairs that are in Anagen. By treatment 5, you've effectively treated 100% of the hairs in that area once while they were in the correct growth stage.
Treatments 6–10: Second pass (retreating)
You cycle back through and retreat those same hairs a second time in Anagen. This reinforces the damage to the follicles from the first round.
Treatments 11–16: Third pass (clinical endpoint)
A third cycle through ensures you've thoroughly treated all the hairs multiple times during the correct stage of growth to reach true clinical endpoint.
After clinical endpoint: The client only needs to come in once or twice a year for touch-up services when they start to see regrowth.
How To Educate
Now that you understand the science, here's exactly how to explain it to the client. Don't get overly technical — no deep dives into Anagen, Catagen, Telogen. The client is experiencing laser for the first time while you're talking. Keep it focused on the why and get to the point.
Point 1: How laser works
"The way laser works is it uses heat to kill the hair follicle." Tie in how good of a candidate they are: "You're a great candidate for laser because you have dark hair and light skin. The color in the hair is what attracts the heat — that's why you're a good candidate."
Point 2: Why they need to keep coming back
"Not all of your hair today is going to be in the stage of growth to maximize our results. Only about 20–40% of it is at that stage right now. So I need you to keep coming back because next time we'll be treating a different group of hairs in the correct stage, and then another group the next time. We want to treat the hairs while they're in the right stage up to three times to reach clinical endpoint. It's going to take about 4–6 months to treat all the hairs once, and then we go through that two more times to reach true clinical endpoint — which is when we've killed or miniaturized as many hair follicles as possible."
Point 3: When to come back
"Come see me in X weeks so we can treat the next group of hairs."
Setting expectations on results
Be direct: laser does not mean 100% hair gone. Even the best candidate can expect up to 92% hair reduction. Tell them on day one so there are no surprises at the end. And make it clear that the 92% is contingent on consistency — coming in on schedule and not stopping and starting.
You're ready to move on from education when the client understands these three things:
- If you stop between treatments, we're starting the process over
- If you wait longer than the recommended timeframe, results will suffer
- If you're not consistent, we won't get maximum reduction — up to 92%, but that drops if we're stopping and starting
Why We Educate
Education isn't just information — it's what makes the membership conversation work. Here's why each educational point matters.
Reason 1: Makes it personal
You can't personalize anything unless you know the client's personal reason for coming in. That's why finding their need comes first. When you deliver your educational points, tie it back to their specific need at the end. For example, after explaining consistency and clinical endpoint: "So if you come back to see me in X weeks and we continue treatment, we'll be able to get you maximum hair reduction so that you can [their personal need]" — less ingrowns, less maintenance, whatever they told you. The education may sound similar for every client, but the ending should be different every time because it's personal.
Reason 2: Sets expectations and builds trust
When you tell a client what to expect and then it happens, that builds trust. They think: "She said this would happen, and it did." That trust compounds — so when you later recommend additional treatments, adding areas, switching to sugaring after laser, or recommending a product, they already have rapport with you. Transparency through the entire process is what creates that.
Reason 3: Gets them in the right mindset for membership
By the time you explain the membership, you want the client already thinking: "Yes, I want to keep doing this because I understand it will solve my problem." The membership is just the vehicle that saves them money while doing something they already want to do. If they haven't had the education conversation first — if they don't understand why consistency solves their need — the membership pitch falls flat. Education first, membership second. They need to want to be consistent before you ever mention saving money with a membership.
Module 4: Membership
Pre-Book
Finish education about halfway to three-quarters through the service. Use the remaining time to connect with your client and finish up. Then move into pre-booking — in a suite, this is when you're heading to the computer and the client is getting dressed. In a flagship, it's as you exit the room and walk to the lobby.
The pre-booking question:
"X weeks from today is [date]. Would you like a similar time as today's appointment?"
This assumes the pre-book rather than asking a yes/no question. Most clients will go with it. If they have an objection, they'll raise it.
Why pre-book before explaining membership:
If the client is already booked for their next appointment, there's even more incentive to get on a membership and save money on that next service. This helps with objection handling later.
Important — pause before completing the booking. Pull up Boulevard with their name, get to the point where you'd type in the service, and stop there. Don't complete the pre-book yet. This is where you explain the membership, because whether they get on a membership (and which type) determines which service you book them for.
Understanding The Membership
The laser membership is structured exactly like the existing Wax/Sugar membership so clients can easily understand it if they've been members before.
How it works:
- One-time startup fee: $250 or $450 (depends on membership type)
- Monthly payments on the 1st or 15th create a voucher in their account
- Voucher is used when they come in for their service
- Pause or cancel anytime
- Financing available through a partner firm for clients who qualify (set up on the day they sign up)
The 16-treatment cap:
The membership stops charging and accruing vouchers after 16 payments — matching the average number of treatments to reach clinical endpoint. Treatments start at every 4 weeks, then space out to 6–8 weeks as you progress, but the monthly charge continues until 16 vouchers are reached. If a client needs additional treatments beyond 16, they just come in and pay member price — no need to adjust the membership. They get member price for life, including yearly touch-ups.
Single Area Pricing
Areas are grouped by size: extra small (individual face areas like lip, cheeks, chin), small, medium, and large.
- Extra small and small area memberships: $250 startup
- Medium and large area memberships: $450 startup
The monthly charge varies by area size. For example, Brazilian (medium area) is $450 startup + $85/treatment. Non-member a la carte pricing is more expensive to incentivize membership — laser isn't a one-and-done service, so you want clients on a membership to reach clinical endpoint at a better price.
Combo Memberships
This is where it gets exciting. Clients with at least two medium-size areas qualify for combo pricing, and they get underarms for free. All combo memberships are $450 startup. Combos go from Pick 2 up to Pick 10 (for full body). Each bump up adds $45/treatment.
Key insight for pricing: Since each combo bump is $45 and a single small area membership is also $45, once a client has two medium areas, any additional medium or small area just bumps them to the next combo tier instead of needing a separate membership. One membership, one price, underarms free.
Membership Upgrades
- Client on extra small or small ($250 startup) upgrading to combo → charge the $200 startup upgrade difference in Boulevard, then cancel old membership and set up the new one
- Client already on medium, large, or combo ($450 startup) adding areas → no additional startup fee, just cancel old membership and set up the new tier
Membership Examples
| Scenario | Areas | Combo Tier | Startup | Per Treatment | Notes |
|---|---|---|---|---|---|
| Brazilian + lower legs | 2 medium | Pick 2 | $450 | $115 | Free underarms |
| Brazilian + full legs + stomach strip | 3 medium + 1 small | Pick 4 | $450 | $205 | Free underarms |
| Lip and chin | 1 small (paired) | Single | $250 | $45 | — |
| Full face + Brazilian + underarms | 2 medium | Pick 2 | $450 | $115 | Underarms free |
Important: Always ask about other areas of interest during the service — it changes how you pitch the membership.
Explain The Membership
Keep this as simple and clear as possible. Confusion causes clients to say no. Before you start, you should already know from your conversation what areas they're interested in — this determines whether you present single area, combo, or both.
Use the trifold brochure.
In a suite, open it on the desk so both of you are looking down at it. In a flagship, come around the counter and stand next to the client. Point to pricing as you explain. This gives the client something to look at while processing, avoids awkward sustained eye contact, and lets you pause to gauge their reaction — look for nods, engagement, or glazed-over eyes.
Don't rush, but be concise. Pause between points and check that they're following.
Single Area Script:
"Today you're at [price] for your service. The way our membership works is there's a one-time startup of $450, and then each month on the 1st or 15th, [amount] comes out and puts a voucher into your account for your session. So when you come in, it's already paid for."
"You can pause or skip months anytime, and you can cancel anytime through the app. You have full control."
"Once we reach clinical endpoint — which is on average about 16 sessions — we end the monthly payments and you'll just come in one to two times per year for touch-ups at member price."
Then present the combo (for most clients):
Even if the client is only getting one area today, if they've mentioned interest in any other areas, present the combo option. You don't need a firm yes or no on whether they want additional areas — just knowing they're interested is enough to present the options.
"We also have a combo membership which pairs services for a cheaper price per treatment. It's still that one-time $450 startup, and then [amount] comes out monthly on the 1st or 15th, putting a voucher in your account. All the combos come with underarms for free. So for [price] per treatment, you'd get [area], [area], and underarms."
When to use single only vs. combo:
If the client is only interested in one area and doesn't qualify for combo pricing (they need at least two medium areas), use the single area script only. If they've expressed any interest in additional areas — even casually — present both options and let them decide.
Close The Sale
After explaining the membership, close with one of these approaches:
Approach 1: Assume the sale (recommended)
"Are you thinking the single area or combo membership would make more sense for you?"
This assumes they're getting a membership and just asks which one. It gives them an opening to ask questions or share hesitations so you can objection handle and guide them toward the right option.
Approach 2: Direct ask
"Would you like to set up the membership so we can get you the hair reduction results you're looking for?"
Either way, this is when the client will ask questions or voice hesitations — handle them from there.
Hand them the brochure. Whether or not they sign up, give them the trifold brochure you used during the explanation. They take it home. If they're on the fence, it gives them something to reference later.
Profile Notes
Once the client walks out the door, put notes in their profile. Two things matter:
1. Other areas of interest.
If they mentioned any interest in additional laser areas — even casually — note it. A client might decline a combo membership today but be open to upgrading later. Since upgrades are easy, you or another laser tech can follow up next visit and encourage them to add areas.
2. If they didn't sign up, note why.
What was their objection? How did you handle it? This sets you or the next laser tech up to customize the approach on future appointments and close the sale down the line.